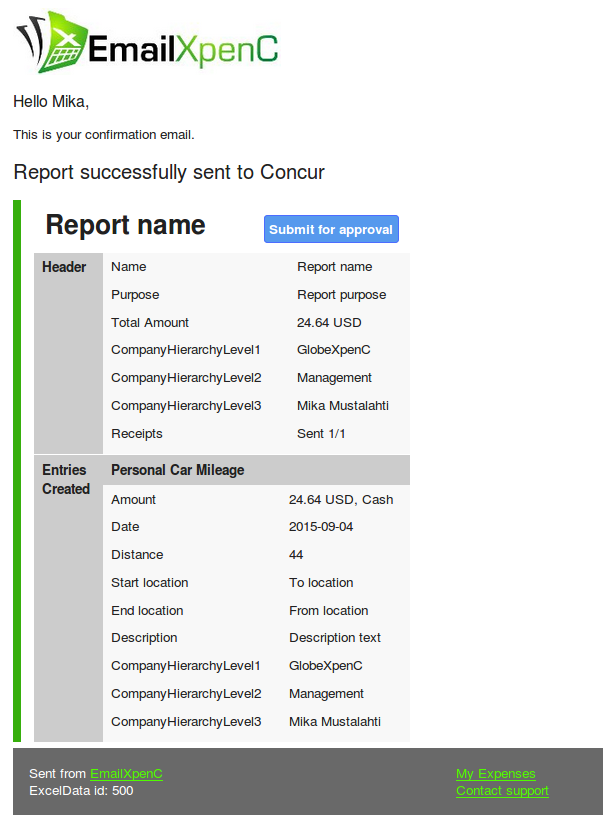
Excel Import
With Excel Import, you can import card transactions from any card brand and bank. You just need to download the transactions in excel or CSV format from your bank or card issuer and then use our import tool to push the transactions into Concur.
Transactions can be imported into Available Expenses or directly into an expense report. Available Expenses import only supports very basic fields and a subset of payment types. Importing to expense reports supports all the basic and custom fields and all of your payment types.
Excel Import is only available for company accounts. Personal users can use our Excel Spreadsheet and email solutions.
Start new import
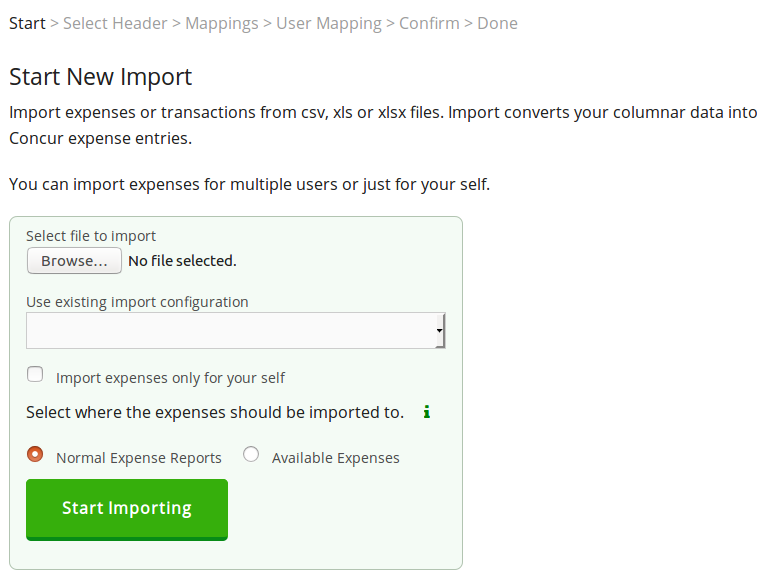
Navigate to "Company Admin" -> "Excel import" and you will see a page to start a new import. Here you select the excel file to be used in the import. You can select a previously saved import configuration (you can save the configuration at the end of the import).
You can import transactions as normal expense reports or available expenses. Normal expense report option will send each users' transactions into an expense report in their own Concur account. It can either create a new expense report or update existing one. This option is more flexible and supports all your custom fields.
Available Expenses option imports the transactions into "Available Expenses" box. Users will need to move the transactions into a report by them selves. Available Expenses option is more limited in terms of supported fields.
If your employees use Expense IT product we recommend importing the transactions as normal expense reports. It works nicely together with Expense IT.
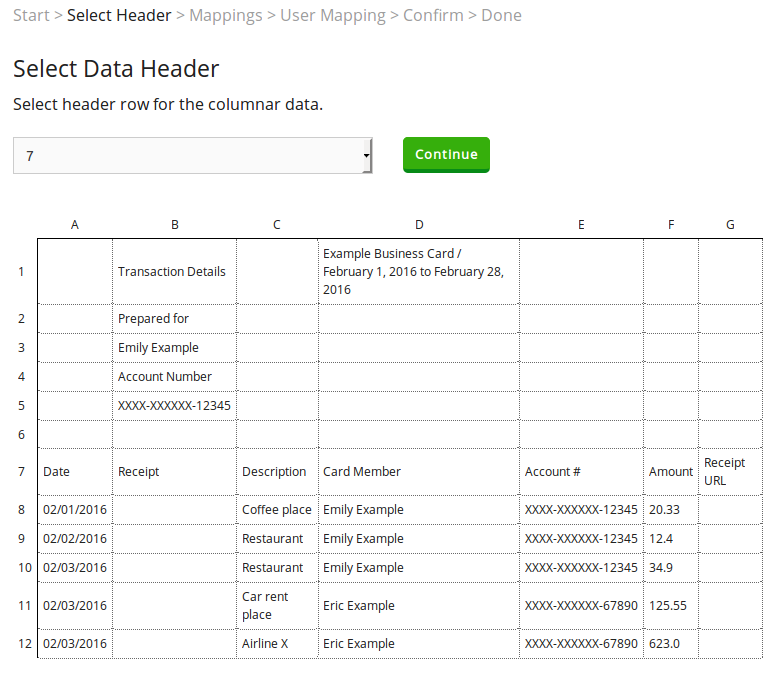
Select header row
The next step is to select the header row from the imported file. The tool automatically suggests the row that is longest.
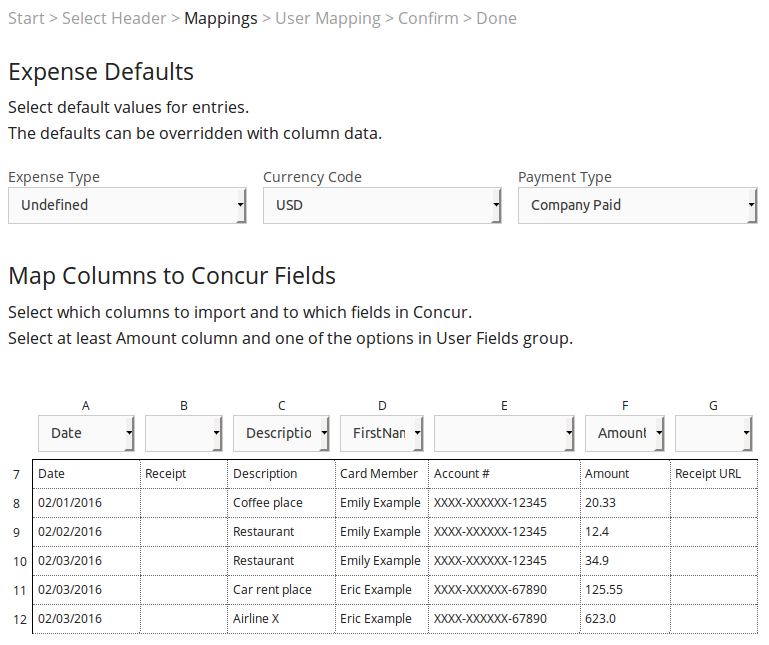
Column mapping
In this step you define how the data in the excel file is imported. On the top of the screen you need to select default values for Expense Type, Currency and Payment Type. In the middle you select which excel columns are imported and to which fields in SAP Concur. One of the columns needs to contain the user to whom the expenses are imported to.
If you selected the "normal expense reports" option in the beginning. This page has also an option where you can make the import to use an existing report if there is one available. Also you can define the name of the report that will be created if a report needs to be created.
Also in the "normal expense reports" option you can use the "foreign currency" and "foreign amount" fields if the transaction was made with a foreign currency and your excel file has the foreign amount in a separate column. EmailXpenC will use this information to calculate the exchange rate and send it to SAP Concur so that the amounts in SAP Concur will match to the amount your company was charged.
User mapping
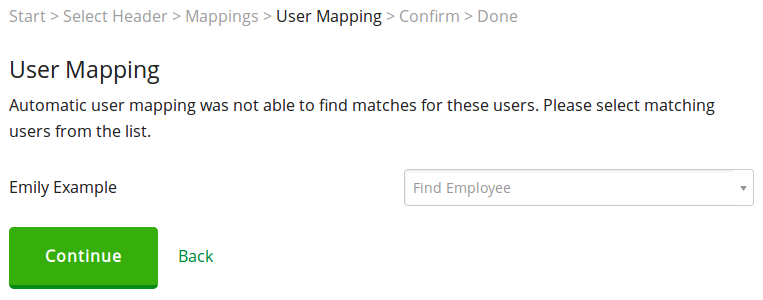
If the tool was not able to automatically find a matching user for all the rows it will show you a screen where you can select the correct user for the expenses.
Confirmation
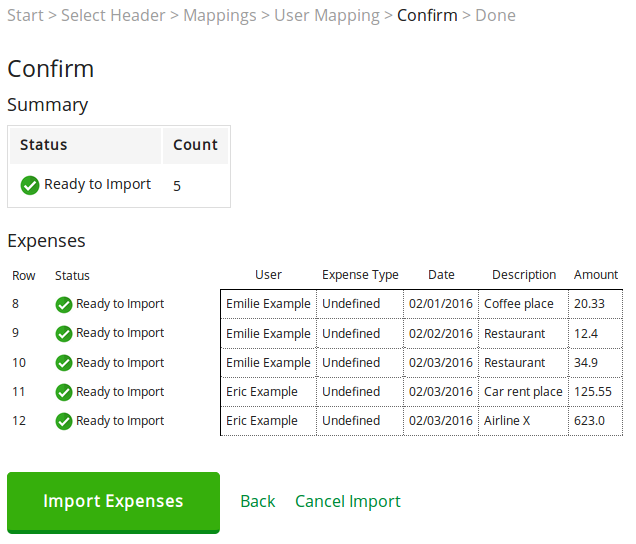
Before the import actually happens you will see a confirmation page where you can check that everything is the way it should be.
At this point our tool has checked from SAP Concur if some of the transactions have already been imported or otherwise added to SAP Concur. Those transactions are not going to be imported as we don't want to create duplicates. Our tool also takes into account that there can be more than one transaction with the same amount on the same day. In this case we count the number of transactions in SAP Concur and in the excel file and import only the transactions that were missing from SAP Concur.
Done
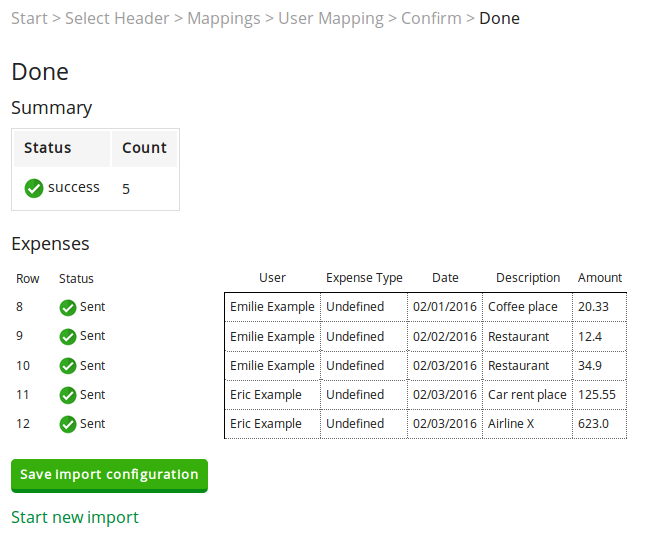
Once all the transactions have been imported you will see the done page. On this page you can save the import configuration for later use. It will save the used columns, defaults, mapped users and more. Pretty much all the details are saved so that when you import the next file you don't need to configure everything again.
If you used a saved configuration for the import, then the done page has a button for updating the saved configuration with any changes you made into the configurations.
The import tool can be used to import thousands of transactions for multiple users. For simplicity, the import in the pictures had only a few transactions for two different users.
How to start using the tool?
It is easy. See our company registration page. You will need to connect our enterprise app "EmailXpenC for Businesses" in the SAP Concur App Center to create a company account with us. The registration page also has a license calculator for company accounts.
After the company account has been created, EmailXpenC synchronizes with your SAP Concur instance. Depending on how big your SAP Concur installation is, it may take anything from few minutes to few hours. Once the synchronization is done, you can start importing transactions to SAP Concur.
Excel Spreadsheets
Our tailored excel spreadsheets are easy to use, efficient and most importantly, time-saving. When signed in on EmailXpenC.com, you will find your personalized Excel templates available for download.
To create an expense report, simply download your personal expense template from 'My Expenses -> Downloads'.

Choose the template which fits your needs and click "Download". In a few seconds you will find the downloaded template on your computer.
Open the file, allow editing the file and enable macros.
Macros are used to automatically check that you are using the most recent version of the template and update all the data in the template. Macros are also used for storing the receipts into the template and sending the report to SAP Concur. See using the templates without macros if you wish not to enable macros.
Start creating the expense report by selecting the expense type and filling in the expense information. The standard templates do include only the basic expense information. Any custom fields that may be used in your SAP Concur expense forms can be added to a customized expense template that are available for our company customers. Read more about custom expense templates.
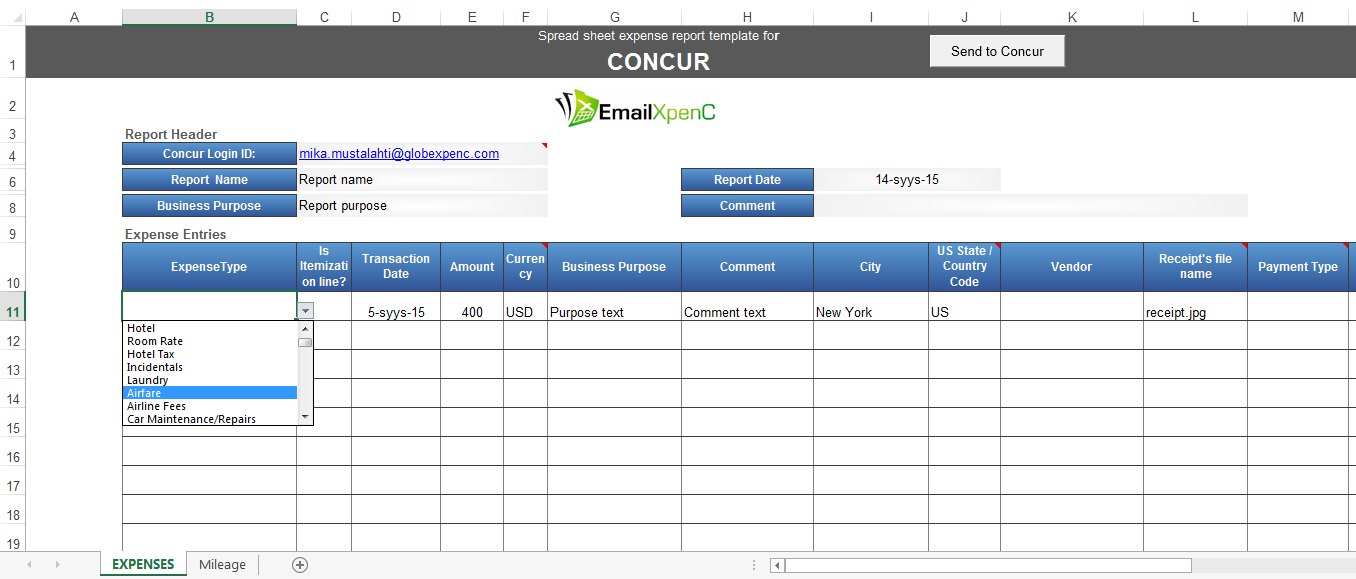
The expense entries can be itemized using the "Add/Change itemization" cell besides the Expense Type field. Insert the desired number of itemization rows and press enter.
Attendees (Company customers only)Attendees can be added to the expense entries by selecting "Attendee" into the Expense Type field right below the expense entry row. You can add multiple attendee rows below the entry. All attendee rows will be added to the first expense entry above them.
Receipt ImagesTo attach snapshots of your receipts to the expense report simply click on the "Receipt's file name" cell and choose the image from your computer. The filename will appear in the cell and the image will get attached into the template.
Send to SAP ConcurTo send your report to SAP Concur just click the button "Send to SAP Concur" in the top part of the template. Your expenses and any receipts attached will be sent to SAP Concur and you will receive a Confirmation Email. Confirmation email will include a button for submitting the report for approval.
Mileage reports
For mileage reports, download our dedicated Mileage template or combined Expense & Mileage template from 'My Expenses -> Downloads' section. If you downloaded combined template, you will find the "Mileage" sheet in the worksheet tabs.
Simply type in the mileage information and send your report to SAP Concur with the macro button.
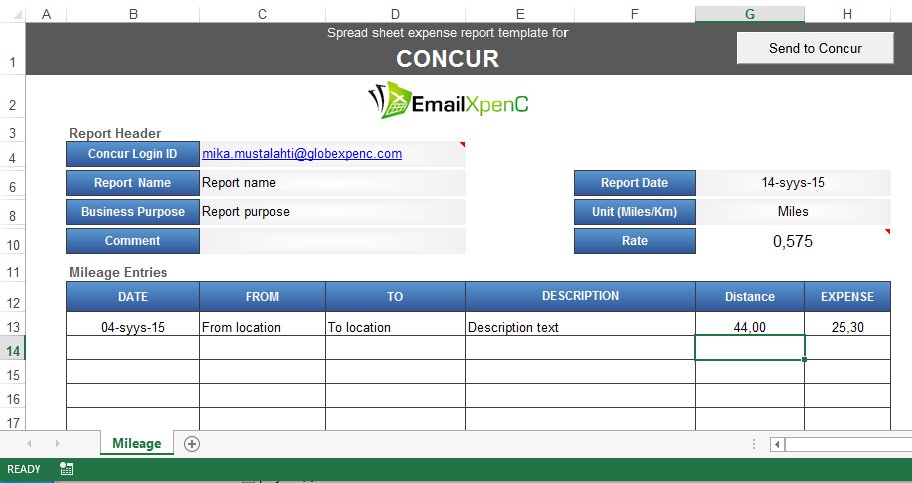
Using a template without macros
When using a template without macros the process differs a bit. When adding a receipt for your expense you need to write the name of the receipt file into the "Receipt's file name" cell instead of being able to browse the receipt from your computer. When sending the report to SAP Concur you will need to email the template and any named receipt files as attachments to reports@emailxpenc.com.
Custom Excel templates
Customized Excel® templates and company spreadsheet conversions are available for our corporate customers. If your business requires custom fields, visual customization, added columns or other custom features, we are glad to tailor the template to suit your needs. For more information, please contact sales@globexpenc.com.
Fast Inserts by Email
Sending expense reports by email is both simple and fast. Simply type the expense information directly into email and send it to reports@emailxpenc.com along with the receipt. Instead of sending your receipts into receipt store you can send them directly into an expense report.
Start new report
The message below would create a new expense report with one expense line in it. The expense report will be named after the email subject, "New York sales conference" in this case. An Airfare expense will be added into the report with amount of 250 USD, location "New York" and description "Boston-NY flights". The expense date will be the current date.
Update existing report
Emails can be also used to quickly update your previously started expense report.
In the message below the subject "Update" will make EmailXpenC to add a new expense line into your previously created expense report. It will add a Dinner expense with amount of 50 USD, location "New York" and description "Client Dinner"
Expense syntax for emails
The syntax for the expense lines is:
Expense Type; Amount; Location; Description
Additional attributes such as date, receipt, comment, etc. can be easily added:
Expense Type; Amount; Location; Description; date: 5/11/2014; receipt: attached_receipt.jpg; comment: comment text
Usually you don't need to specify the receipt for the expense it is enough that you attach the receipt into the email. Receipt needs to be specified only when using receipt capture and if you are sending multiple expense lines in one email, then you need to specify which attached receipt will belong to which expense line.
Report header information can also be included:
Comment: Example comment
Concur login: example@example.com
Expense Type; Amount; Location; Description; Attribute1; Attribute2
Also attendees, itemizations and mileages are supported. Learn more about email expensing from the user guide.
Capture Email as Receipt
Directly forward an email (such as flight itinerary) to be captured as a receipt.
Note: Add expense information on the first line of the email and add an attribute receipt: capture.
Confirmation Email
After sending the report, you will receive an email with a summary of your expense report and a link to submit for approval.
The email also notifies you of any possible errors and gives instructions on how to resolve them. Your reports will only be submitted after they have been screened and have received your approval.
